

CATEGORY LIST

PRODUCT DETAILS
Price: $35.90
Rating:
Author: DWBooster
Web: www.DWBooster.com
Web: www.DWBooster.com
ADD TO CART AND CONTINUE:
PURCHASE & DOWNLOAD:
Preferred payment method:

Guestbook+Reviews Bubble
 The Guestbook concept is widely used by webmasters on their webpages as a feedback source, and as a rating feature that measures the impact the site has on its users. A guestbook is usually published as a separate section within the webpage. Time is a valuable resource, thus knowing right away the number of Guestbook entries without even going to the page is quite important.
It is because of this need that we launched our product Guestbook + Reviews Bubble. Both Guestbook and Reviews Bubble exist in our catalogue as separate items but their combination becomes, in our eyes, an essential tool for webmasters. This package has the benefit of acquiring both products in one with a 10% discount.
FEATURES
- The "Guestbook System" collects user feedback in an intuitive way and displays it on the same webpage where they were inserted.
- The "Guestbook System" allows editing or deleting entries, as well as contacting users that submitted them.
- "Guestbook System" is based on the
hreviews standard. The elements created under this standard are more useful and can be interpreted by applications able to recognizehreviews . - "Reviews Bubble" is basically a link to the guestbook represented in form of the current amount of entries left by users in the Guestbook itself.
Demo
Follow the links below to check the Guestbook system completely. The Guestbook system has:
Comments
Comments
Comments
Comments
Comments
REQUIREMENTS
- Adobe Dreamweaver, MX or later versions.
- The server where the website is hosted must support PHP 4.3 or higher.
INSTALLATION AND USE
Extension installation
"Guestbook + Reviews Bubble" can be installed by executing the GuestbookReviewsB.mxp file or using the "Adobe Extension Manager" software.
Once installed the extension administrator can be accessed from
Extension use
The Guestbook System
To use Guestbook System, you first need to have defined, in Adobe Dreamweaver, the website that you are building. The page where Guestbook System will be inserted, must be previously saved within the website.
Select the menu option "Insert Guestbook system", as described under Installation. The Setup Window will appear. The fields of the Setup Window are:
If you had previously inserted a Guestbook System into the same website, a checkbox will appear to use the existing copy without the need of overwriting files.
Note: if you insert a new instance of the extension in your website, the previous one will be overwritten. All the previous setup information will be lost.
Administration password: enter the password that you wish to be using when accessing Guestbook System's administration area.
Moderate posts: check the box if you want to approve explicitly the reviews before publish them.
Send me notification emails: this option must be selected if you wish to be notified when a new post is published on your Guestbook. The notification email will contain all the info published in the post.
Insert your email: enter the email address where you wish to receive notifications for each new post published on your website.
I use a SMTP email server: this option must be checked if your hosting provider uses a SMTP server for sending out emails.
SMTP email server address: enter the address of the SMTP server from which the emails will be sent.
Anonymous: check this option if your SMTP server does not require authentication.
User: the user name for SMTP server authentication. This field is only required if your SMTP server requires authentication.
Password: the password for SMTP server authentication. This field is only required if your SMTP server requires authentication.
Note: if you don't know exactly how your hosting provider sends out emails, please contact them before inserting the Guestbook system into your website.
Once Guestbook System has been inserted, a new folder is automatically created at the root of your website, with the name "dwb_guestbook". The new folder contains all the code necessary for the correct functioning of the Guestbook, as well as a folder named "db"(this folder must have writing permissions set), meant for storing the posts in an XML file. Accessing the administration of posts published in the Guestbook is done via a webpage "administration.php" which is also created automatically inside the folder dwb_guestbook.
Note: the folder db needs to have writing permissions in order to be able to create an XML file that will contain all the posts published in your Guestbook.
To manage the Guestbook, you will need to access the administration page:
http://www.mywebsite.com/dwb_guestbook/administration.php
(www.mywebsite.com should be replaced by your website's name)
To access the protected area, you will need to enter the password that you selected during the Setup process.
How to manage the Guestbook
To manage the guestbook, you need to access the administration page:
http://www.mywebsite.com/dwb_guestbook/administration.php
(www.mywebsite.com should be replaced by your website's name)
Enter the Password that was selected during the setup process.
Once inside the Administration Area, you will be able to see the full list of the posts published in your Guestbook. Each post has a series of associated actions: Delete, Edit or Email the Author. The author's email can be accessed only from the admin.
At any time, it is possible to refresh the list of postings in the Guestbook. To do that, simply click on "Refresh the post list" in the upper right corner of the screen.
The Reviews Bubble
To use the "Reviews Bubble" extension, first click on the menu option
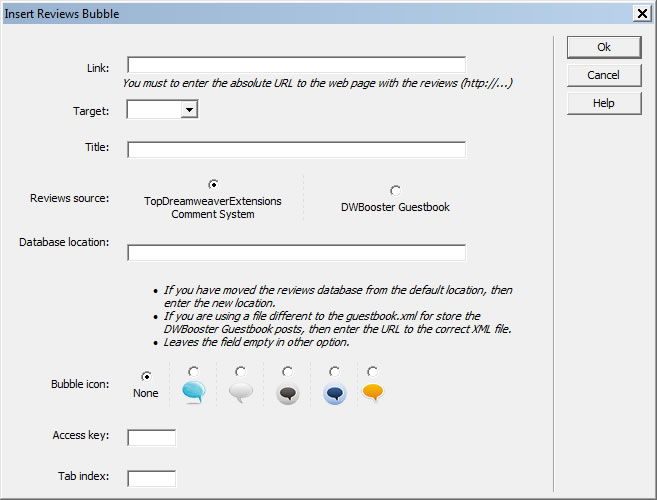
Link: The absolute URL of the webpage where the comments are inserted. (http://...)
Target: Select or enter where to open the linked page.
Reviews Source: Select the comments manager used in your web page. Comment managers currently compatible with Bubble are "System of Comments" and "Guestbook".
Database Location: Location of the database with comments or reviews. Keep this field empty if you haven't changed the location of the database of the comment manager that you are using. Guestbook, as well as the System of Comments, require the location of their databases to be clearly determined, if it has been changed, you will need to enter the new location. If you are using more than one guestbook in your website, then you must to enter the URL to the XML file that store the reviews.
Bubble Icon: Select the icon to be displayed.
Title: Enter the text to be displayed when the mouse is rolled over the button.
Access key: Enter a letter that will allow direct access to the button. In Windows it is achieved by pressing Alt + Letter, in Mac, Ctrl + Letter, when using a browser.
Tab index: Enter the number for the tab order.
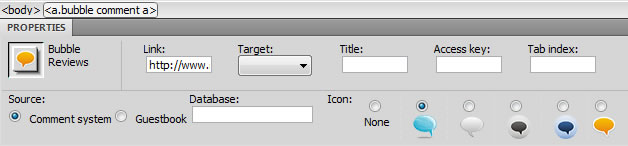
If you wish to change any of the setup parameters, once Bubble is inserted into the web page, simply select the anchor inserted in the web page with the assigned class "Bubble" and change the attributes in the Properties Inspector.
The modified web page as well as the "bubble" folder, created by the extension, must be published onto your website.
SCREEN SHOTS
;)
- click image to enlarge -


.png)

